Posted on

Storing, freezing and thawing sausages

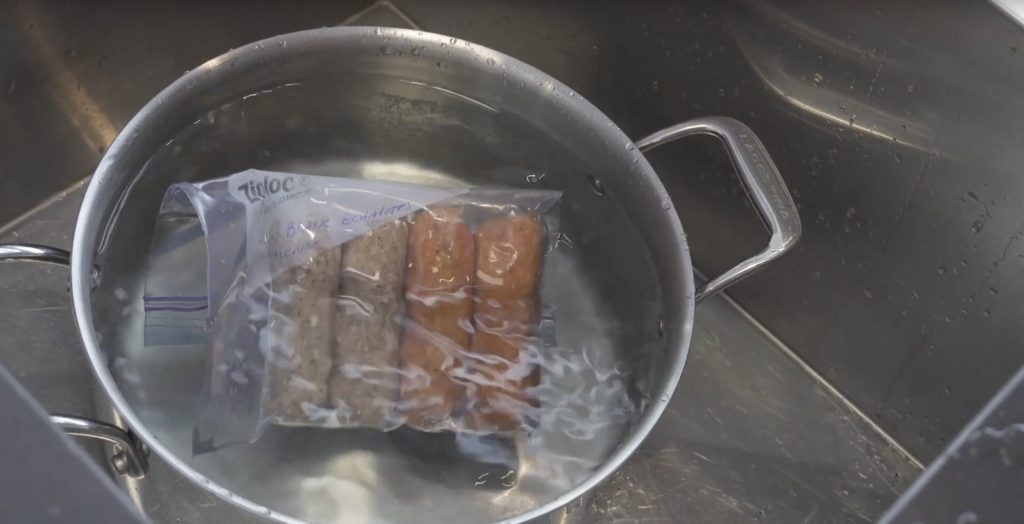
The cost of groceries increases every year in Quebec. There are many ways to save money on groceries, starting with planning your grocery list based on the sales in the store flyer and sticking to it. If you follow our Facebook Page, you’ll notice that our products are often on sale at Costco, Maxi, Wal-Mart and IGA.


You may want to buy a large quantity of a certain product because of a great sale, which is a good idea. However, you may find that the expiration date looms too quickly.


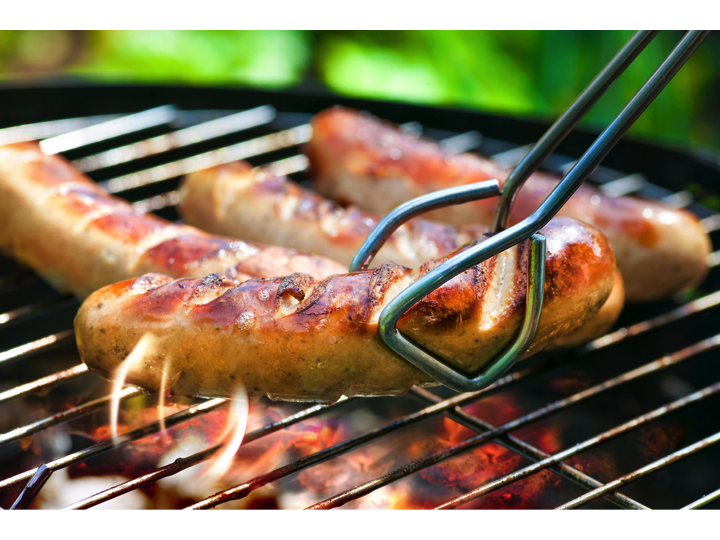
Here are a few tips to keep your sausages and other food fresh longer:


Vacuum packing

Vacuum packing means removing all the air from packaging to keep a product fresh longer. This airtight packaging provides the food with a stable environment free from bacteria that might affect its shelf life.


There are professional-quality tools to vacuum pack raw and cooked foods,  but these machines can cost over $100 and take up space in your cupboards. There is a simple, free alternative—using water pressure to remove the air from packaging. All you need is a Ziploc-type freezer bag, a deep container and water.


Here is the procedure:

  1. Write the date and the flavour of the sausages you are vacuum packing on the freezer bag.
  2. Fill a container or your sink with cold water.
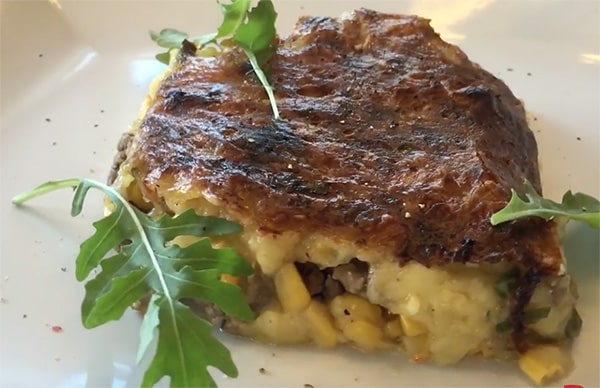
  3. Put the sausages in the freezer bag, but don’t close it.
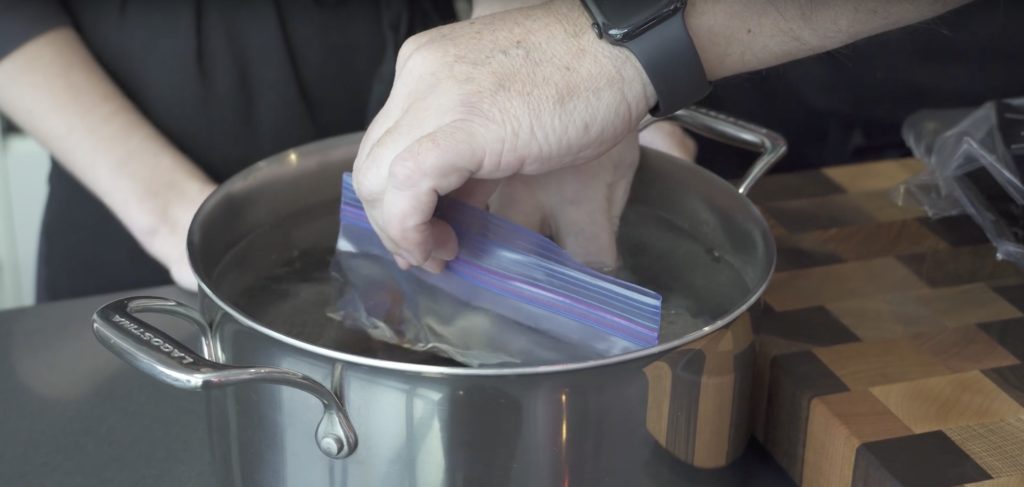
  4. Dunk the bag into the container of water right up to the opening. Make sure no water gets into the bag. The water pressure will force the air out of the bag. Close the bag while it is still in the water.

Once vacuum packed, food can be stored in the fridge for one or two extra days. Vacuum packed bags can also be frozen.


Freezing

Because vacuum packing removes the air, food in vacuum packed freezer bags will stay fresher in the freezer than food in the original styrofoam and cling wrap packaging. By removing the air, you avoid “freezer burn.”


At home, if you have a freezer with frost, you can keep sausages up to 6 months. In a frost-free freezer, the products won’t keep as long— we recommend a maximum of 3 months due to the ventilation of that type of freezer. After the recommended amount of time has elapsed, frozen sausages will still be safe to eat, but their taste and texture may be altered by too much exposure to cold.


Thawing

There are two ways to thaw sausages, one quick and one overnight.

  • If, like many, you’re cooking lunch or dinner at the last minute, you’ll prefer the quick method, which only takes 15 to 45 minutes to thaw. All you need to do is submerge the Ziploc bag containing the sausages in a container of 10°C water. It isn’t a good idea to put a frozen product directly in hot water, because the temperature will change too quickly. For an even quicker thaw, you can put the container in the sink and let a thin stream of water run over the packaged sausages. With this method, your sausages will be ready to cook in around 20 minutes. In a container without running water, it will take the sausages up to 45 minutes to thaw completely.


  • However, if you’re meal planning in advance, you can simply put the sausages in the fridge overnight, and they will be ready to cook the next day.


See the instruction on video (French only) :


Enjoy!

Posted on

Cooking sausages in the oven

Your kitchen can quickly become chaotic if you’re making food for a crowd. When you need to prepare large quantities of food, fresh sausages are a great option due to their low cost, variety of flavours and cooking speed. For around ten guests, if you count two to three sausages per person, you can spend less than $3 per person with our combo packages on sale.


If you want to spend the least amount of time possible in the kitchen and have fewer dishes to wash, we recommend cooking the sausages in the oven. The method is just as simple as cooking them in a pan , but you can cook more at a time. Here’s how:

  • Preheat the oven to 375°F and cover a large baking sheet with aluminum foil.

The aluminum foil will stop the sausages from sticking to your baking sheet and make cleanup easier. For a more eco-friendly solution, silicone baking mats work just as well.

  • Using tongs or your hands, place the sausages on the sheet, leaving space between each.

Avoid using a fork or knife to handle the sausages, because you don’t want to damage the vegetable casing. The casing keeps all of the aromas and flavours inside the sausage while it cooks. If the casing is pierced before or during cooking, the sausages will lose tenderness and flavour because the juices will leak out.


It is also important to avoid letting the sausages touch while they cook, otherwise they may stick together and it will be difficult to separate them without breaking the crispy seal the product develops once it’s cooked.

  • Cook the sausages in the preheated oven for 10 to 12 minutes.

Il n’est pas nécessaire de faire bouillir les saucisses avant de les mettre au four. Cela laissera échapper les saveurs, laissant les saucisses moins tendres et moins goûteuses.

  • Retourner les saucisses.

The sausages do not need to be boiled before going into the oven. Boiling them will cause the flavours to leak out, leaving the sausages less tender and flavourful.


You can turn the sausages once or twice so that they cook evenly and develop a nice golden colour on all sides.


They are done when a meat thermometer inserted into the sausage reads an internal temperature of 60 to 65°C (140 to 150°F). Let the sausages rest for around five minutes before serving—they will be packed with juices.

The cooking method is also explained in this video (French only):


Here are a few recipes you can whip up while the sausages are cooking to round out your meal. If you’re cooking for a group, feel free to double or triple the recipes so that there’s enough for everyone.


Sandwich with bacon & cheddar sausage

Pickles, bacon, and sharp cheddar in a fresh submarine bun—what could be better?


Sandwich with white wine & shallots sausage

Homemade dijonnaise sauce and a shallot chutney enhance our white wine & shallots sausage for a high-end hot dog!


Happy cooking, and enjoy your meal!

Posted on

Five Tips for Cooking Sausages Perfectly in a Pan

Fresh sausages are delicious and easy to prepare once you know how. They are available almost everywhere and are often on sale at a grocery store near you. There are a variety of sweet and savoury flavours—bacon & cheddar, Italian, Toulouse, ham & maple, Mexican, etc.— that lend themselves to many different types of meals. They can be served as hors d’oeuvres, starters or mains, and they are just as good for lunch the next day.

To prepare sausages, you can use almost any kind of frying pan—non-stick, stainless steel or cast-iron—and the result will be more or less the same. We recommend a cast-iron pan because it distributes the heat most evenly, although it takes a little longer to warm up.


Here are our five foolproof tips for cooking sausages perfectly in a pan.

  • Don’t boil the sausages.

Boiling sausages before cooking them in a pan causes the aromas and flavours of the product to leak out. The sausages will become bland and you will no longer be able to taste the carefully chosen spices. The sausages don’t need to be blanched beforehand—they cook quickly in the pan.


  • Don’t pierce the sausages.

Use tongs or your hands to handle the sausages. Piercing the sausages with a fork or a knife creates holes, causing the flavours to leak out during the cooking process and be lost in the pan.


  • Don’t use grease in your pan.

You don’t need to add butter or oil to the pan before cooking. The sausage’s natural fat will be released during the cooking process, which will stop the product from sticking to the pan while preserving its flavour and giving it a pleasant golden colour.


  • Don’t place the sausages too close together while cooking.

It’s important to leave space between each sausage in your pan so that you can turn them over to achieve an even doneness. You want them to be nicely browned and caramelized on all sides for a better taste.


  • Don’t overcook the sausages.

An overcooked sausage will lose its juices and its tenderness. We recommend cooking the sausages for 10 to 15 minutes or until a meat thermometer reads an internal temperature of 60°C to 65°C (140°F to 150°F). At this temperature, the product will be tender and juicy and you will be able to taste the spices with every mouthful.


The cooking technique is shown in this video (French only) :


To summarize, when preparing sausages at home, handle them carefully before and during cooking to avoid piercing their vegetable casing and letting the flavour out. For best results, start cooking the sausages in a hot pan, without oil or butter, on medium-high heat. After one minute, lower the heat to medium and cook the product for 10 to 15 minutes, rolling it frequently in the pan. After the sausages are cooked, let them rest for around five minutes before serving—they will be juicy and full of flavour.


If you are cooking with our combo packs of two, five or six different flavours, make sure you don’t mix them up so that you can tell which is which during the meal. Or, if you prefer, you can mix them up and test your ability to recognize the different flavours by their colour, texture and taste.

Our sausages are delicious on their own, or you can add even more flavour with a sauce or dip.

Here are a few ideas to pair with our favourite sausages:

  • Toulouse with tomato sauce
  • Hot Italian with yellow mustard
  • Mild Italian with Dijon mustard
  • Ham & maple with cranberry sauce
  • Mexican with guacamole

Feel free to share your favourite sausage/dip combo with us.


Happy cooking, and enjoy your meal!

Posted on

BBQ: A Summer Staple

Although our Gourmet Workshop products cook up well on the stove, barbecuing them brings out even more delicious flavour.

Here is our best advice for a great barbecue every time!

Start with a clean grill

Before cooking anything on your barbecue, make sure the grill is clean. Remove any food residue and make sure your barbecue is working at its best.

Did you know that metal brushes have been proven to have adverse health effects and are therefore not recommended? Take a look at these simple, cheap alternatives to the traditional brush, and make sure you handle your food with tools that are safe for you, your family and your friends.

photo : Pinterest


Preparation

Be a BBQ pro: Temper your meat before putting it on the grill. Tempering the meat (while respecting food safety measures) will give it a more even, pleasing colour.


Preheating your barbecue for five to ten minutes before putting the meat on is another tip to keep under your amateur chef hat. We promise results worthy of the best grill restaurants right from your backyard!


Our AAA Canadian beef tournedos can be tempered 30 minutes before cooking


The ABCs of perfect cooking

Whether you’re cooking sausage, beef tournedos or coq au porc, the first secret to perfect barbecuing is to avoid charring the meat. Using indirect heat will give you a more even temperature, and you will avoid the frustration of seeing your prime cuts of meat engulfed in flames.


  • For gas BBQs: Light one side and cook on the other with the lid down.
  • For charcoal BBQs: Position the hot coals on one side and cook on the other with the lid down.


Handle with care

A good pair of tongs and a spatula are your best tools for barbecuing. Forget forks—piercing the meat releases juices that are essential to preserve flavour and tenderness. The result: dry, tough, flavourless meat.

Simple sides

How about simplifying some well-known barbecue sides?


While your main is cooking, roughly chop the vegetables you have on hand (zucchini, onion, cauliflower, peppers, etc.), brush them with olive oil, season with salt and pepper and grill them for two to three minutes on each side. Garnish with a bit of chopped basil and parmesan shavings, and we guarantee your guests will be asking for seconds!


Foil is another good option: Add potatoes, fresh vegetables, butter and seasonings, seal them in aluminum foil and grill them for around 20 to 30 minutes.


Photo : Chatelaine

Let the meat rest

Is letting the meat rest essential? Absolutely!


Just remember to check how cooked the meat is before letting it rest—its temperature will continue to rise, so it could become overcooked.


Let individual portions rest for five minutes under aluminum foil so they don’t get cold. Let larger pieces of meat rest for 30 minutes.


Why let the meat rest? Letting meat rest after cooking allows the juices to distribute evenly, resulting in exceptional tenderness and flavour. Try it once—you’ll be astounded by the difference.


Thermometers: Useful or useless?

Cooking thermometers are a must-have. Depending on the type of meat, a thermometer can tell you exactly when it is perfectly cooked. Excellent thermometers of various brands and price points can be found at most markets, grocery stores and superstores.


Are you already salivating at the thought of making your next barbecue a true culinary experience?

Visit your grocery store today for freshly cut meat that is marinated with care, and ask your butchers for advice on how exactly to follow the tips listed above. We promise a meal that will make you barbecue royalty!


Recipes Ideas to make on the BBQ :

MARINATED BEEF TOURNEDOS WITH BASIL AND PEPPER, SIDE OF COUSCOUS


BEEF TOURNEDOS, MIGNERON CHEESE AND FALL VEGETABLES


HONEY AND MONTREAL SEASONING BEEF TOURNEDOStournedos de boeuf mariné miel et épices montréal

PAELLA WITH DALISA SAUSAGES AND CLAMS


DALISA SAUSAGES WITH BEER BBQ SAUCE


SAUSAGE FLAMMEKUECHEFlammekueche à la saucisse


INDONESIAN COQ AU PORC

COQ AU PORC AND CIDER


SHISH TAOUK MARINATED COQ AU PORC

coq au porc façon shish taouk


The Dalisa Gourmet Workshop brings together talented food enthusiasts whose goal is to offer their customers and partners the simple, unique and tasty culinary inspiration.

Posted on

Festive meatloaf

Every family has its classics! I don’t know about yours, but in my home growing up there was Dad’s pizza (every Saturday night) and Mom’s meatloaf. It must have been nice for my parents to prepare these meals, knowing they’d get eaten up in no time.

My mother’s meatloaf recipe could be found in a big yellow cookbook, its pages worn and torn by time and the love it had been given. You might even know it: Jehane Benoit’s Encyclopédie de la cuisine Canadienne (Encyclopedia of Canadian cuisine). There was everything in this book; it was the Bible of family cooking. And on page 98 (of the 1963 edition), there was the recipe for my mother’s oh so succulent meatloaf. Tender and juicy meat with a sweet and spicy tomato glaze: it was excellent!

I find it fascinating that we enjoy these complex and elaborate recipes when we go to the restaurant, and yet find so much comfort and enjoyment in such a simple dish at home. Because let’s admit it, the meatloaf has a very humble background. Many countries have their own version, often made with leftover meat, offal, spices and bread. A bit like Scottish haggis. For us, the recipe arrived with the French, then evolved with the English, to finally become a typical Québécois dish around the 1920s-1930s. During the war and the economic crisis, meat was scarce, but everybody still needed to eat. So to offer a nourishing meal, mothers had the idea to add eggs, milk and bread or cereal to their mixture of meat and spices. The family meatloaf was born.1

It may be simple, but good preparation is still key, otherwise it can quickly become dry and unpleasant.

Jehane Benoit used beef in her meatloaf. My mother never did. Oh wait, she did just once, only to try it and realize she never would again. Unless you pick a fatty ground beef, the result will be too dry. Ground veal gives excellent results, as does ground pork. If you want to use white meat, go for ground chicken instead of turkey for the same reason as mentioned above: when cooked, turkey renders a much drier result. To spice up the taste of your meatloaf, add a portion of sausage meat to your ground meat… you’ll see, it’s delicious!


The choice of meat definitely has a major impact on taste and texture, but the added ingredients to make the mixture homogenous are what make the recipe incomparable. Bread crumbs, oats, corn cereal or fresh bread, whatever suits your fancy! The secret is to let those ingredients sit and soak up the milk before adding them to the meat mixture. One day, wanting to go quickly, I poured the milk over the breadcrumbs and waited for the bread to be just a little moist before mixing it with the meat and putting it in the oven. The result revealed that the art of cooking takes time. My meatloaf had a grainy texture instead of being moist and juicy. It tasted good, but not as good as usual. So it’s important to let bread or breadcrumbs soak up the milk or cream before adding them to the rest of the ingredients.

Spices also add character to your recipe. Nowadays, in addition to onions and garlic, we have access to an impressive variety of spices, which gives us plenty of choice when concocting a dish. With red meats, think marjoram, oregano, and thyme. For pork, try curry, coriander, and sage. If you prefer veal or chicken, go for oregano, paprika, chives or tarragon. You’ll see, the result will be superb!

And about that famous sauce that is poured on top of the meatloaf before cooking, it has a function much more important than simply adding colour and taste: it will protect your meat from getting too dry over the long time spent in the oven. That’s also the reason why a little dry mustard is often added because mustard has the property of helping prevent the evaporation of liquids. It creates a protective barrier. The traditional sauce is made with tomatoes or a mixture of ketchup, sugar and spices, but just browse the Internet a little and you’ll discover the variety of sauces that could give a festive feel to this dish that is, all in all, rather ordinary. How about topping it with a wild mushroom or three pepper sauce? Or what about preparing it au gratin, with cheese melted on top? Other funky options include a Mexican style meatloaf with a mixture of chili spices and a salsa style sauce, or a cheesy meatloaf, with your favourite cheese baked at its centre. Have you ever considered mixing in fruit? I’m thinking pork and apples with a maple sauce… yummy! Are you hungry yet?

Meatloaf is cooked slowly in a traditional oven or slow cooker, which gives it its delicious texture and allows the spices to develop their full aroma. In the oven, on medium heat, it’s ready in about 60 minutes if it’s placed in a traditional bread pan. In the slow cooker, it takes 5-6 hours on low heat.

If, like me, you like to experiment and want a mix of flavours for a special occasion like, say, Christmas, why not make a Christmas log-shaped meatloaf? I tried it! And it was delightful! I chose turkey (for a traditional Christmas feel), pork, ground beef and Italian sausage meat. I placed the sausage in the form of a roll that I put in the centre of the turkey section. I then put the whole thing on a bed of beef to create a beautiful contrast of colour and I finished my roll with a layer of pork. This created a beautiful Christmas meatloaf that I topped with a maple sauce. It’s definitely easier said than done, but the result is worth the effort, believe me! It was beautiful when sliced ​​in the presentation platter, delicious, and smooth on the palate. The sausage spice mixed with the subtler turkey taste and the sweet glaze… fantastic.

The beauty of meatloaf is also in the next day. With the leftovers, you can make a sandwich, a burger or eat it with a salad! If you do have leftovers, I bet they won’t stay in your fridge for long! Happy cooking!


1 Michel Lambert in his book, Histoire de la cuisine québécoise (History of Quebec Cuisine).

Posted on

For the love of pâté chinois!

What’s dinnertime like at your house? In my home, it can be a real puzzle sometimes. I have a boy who leans toward vegetarianism, another one who’s basically a carnivore and a man who teeters between paleo and keto. Obviously, there’s always someone who doesn’t love the meal. Unless I make pâté chinois, that is. Who knows why! This “traditional Quebec dish,” according to Le Devoir, isn’t vegetarian, paleo or keto and yet it pleases every time. Over the years, I’ve improved upon the traditional “beef, corn, potato” recipe to give it a bit of flair.

Pâté chinois was never my favourite meal. I found the one that my mom made dry and flavourless. I added tons of ketchup to make it palatable (sorry Mom—you make the best apple pie in the history of apple pies but when it comes to pâté chinois… not so much). So you can imagine that pâté chinois was never on the menu at the beginning of my relationship. It was pushed back to a gloomy corner of my memory. When I became a mother myself and I had to find healthy dishes to satisfy different appetites over several meals, it suddenly reappeared out of thin air.

I still remember the first time that I made pâté chinois. It was well before the vegetarian concerns of my oldest and the culinary experiments of my partner. The kids ate it quietly and even asked for more. And yet, it was the exact same recipe as the one my mother used. I couldn’t believe it. What is it that makes such a simple dish so popular?

Is it the ingredients? The ease of preparation? The low cost? Maybe it’s a bit of all three. So over time I tried changing it to make it tastier, but without going too far. (I love when my kids eat without complaining!)

I started the transformation by topping it with a mix of cheddar and mozzarella to test out my idea. Yes! Step one complete! Next I tested out the same idea but this time with Reblochon (I’ve always liked the way this cheese tastes with potatoes). Now what to do with this bland meat? How about preparing it with a good brown gravy? Now, I’m not going to list off all of my experiments. Whether they included mushrooms, store-bought sauce, homemade sauce, BBQ sauce or a spicier sauce, I basically let my imagination run wild for some mostly successful results. I even dared to serve vegetarian versions with lentils and smoked tofu bits. Once they got past the shock, they loved it! My favourite is the one with sausage meat instead of ground beef: same texture, exceptional taste. The great thing about sausages is the variety of choice, meaning they can satisfy all tastes.

 Pour l’amour du pâté chinois! 

I remember once trying an hors d’oeuvre version with a slice of sausage, a mini corn patty and some mashed potatoes. At Christmas I also tried an unusual version, to say the least, that I was quite proud of. After baking the potatoes, I cut them in two and emptied them. I mixed the mashed insides with cream cheese. Then, I lined the skins with ground meat, corn and potato, and topped them with melted cheese. It was tasty and fun at the same time. My guests liked the idea but my kids told me they preferred the traditional version.

Speaking of tradition, did you know that no one really knows the origin of pâté chinois? Jean-Pierre Lemasson wrote a whole book about it in 2009 called Le mystère insondable du pâté chinois (“The Unfathomable Mystery of Pâté Chinois”). It has some close relatives, such as hachis parmentier from France, shepherd’s pie from Scotland and cottage pie from Britain, but its origins are hazy and there are several theories out there.

The most often cited theory is that the primarily Asian workers were fed mostly beef, potatoes and corn during the construction of the pan-Canadian railway in the 19th century.

Another theory states that the dish comes from China pie, a local specialty of the village of South China in Maine, where many French Canadians went in the 19th century when there wasn’t enough work on this side of the border.

Some even refer to pemmican as an ancestor of pâté chinois: a dish of meat, fat and dried berries. Others like to think that it comes from the spare rib (“échine” in French), corn and turnip pie eaten when Canada was first colonized. From pâté d’échine to pâté chinois—just one step apart!

What really throws me off is the word “chinois” (“Chinese”). Because of the corn I would’ve thought it would be called something like Indigenous pie. Why “Chinese”? Because of the colour? Because of the city of Lachine (“China”), named after a misguided expedition by Cavalier La Salle and possibly the origin of the infamous pie?

Maybe the answer is even simpler than all that but we don’t know. Not yet, that is!

Anyway, keep that in mind the next time you add corn when making hachis parmentier. I’m curious to learn about your family recipes. What small detail does your family love? My father-in-law always eats it with a marinade, fruit ketchup or zucchini ketchup. Share your ideas and suggestions with us and… bon appétit!